Face Tracking
[ Lecture Notes ] [ Lab ] [ Homework ]
Face Tracking is a special type of motion tracking. After Effects tracks various facial features and structures, and can also calculate a few “measurements” based on the tracking data, such as “mouth open amount,” “eyes closed amount,” and others.
With Expression Controls and a wee bit of expression script, we can also create some useful measurements of our own, such as “Face Center” or “Face Angle”.
Uses For Facial Tracking
The facial tracking feature was added to After Effects in 2015, so it’s still relatively new to AE. It was added along with an early release of Adobe Character Animator (which is an app used to animate cartoon characters faces in real-time using a webcam and an actor’s facial expressions, mouth movements, etc.)
After Effects supports sending facial tracking data to Character Animator, so it seems this was one of their primary intended uses for Face Tracking. Even so, there are a few interesting things we can do with the feature strictly within AE, such as facial distortion, color correction, blemish removal, puppet pin control, and probably lots of things that haven’t even been thought of yet.
How To Do The Tracking
It’s pretty easy to do the actual tracking part. This process will give lots of track point position keyframes for facial features that we can use later on.
- Add a footage layer, one with a person’s face in it.
- Find a good “rest pose,” a frame of the footage in which the face as straight-facing and expressionless as possible.
- Make a note of this frame by (a) selecting the layer and then (b) using the Layer > Add Marker menu command. (Now you should have a little gray triangle marker on the layer to remember where the rest pose is.)
- Create a rough mask around the face to track. It can be a simple mask shape like a circle. (You basically just need to let AE know where the face is.)
- Select Animation > Track Mask from the menu, or right-click on the mask and select Track Mask. The Tracker Panel will open so you can operate the tracking.
- In the Tracker Panel, choose Face Tracking (Detailed Features) and then track forwards and backwards from the rest pose frame using the Tracker play controls.
- AE will track the face. As it does so it will change your rough mask into one whose mask shape is auto-keyframed to tightly follow the contour of the face. Various tracking points will follow the movement of the eyes, nose, mouth, etc. A special-purpose effect called Face Track Points is added to the footage layer, and this is where the data from the track points gets stored as keyframes for later use.
What To Do With The Face Tracking Keyframes
Snapchat Filter Stuff
You can do some simple Snapchat-filter-esque things right away by adding an expression to the property to be controlled and using the expression pickwhip to grab the code for a track point such as Nose Tip for example.

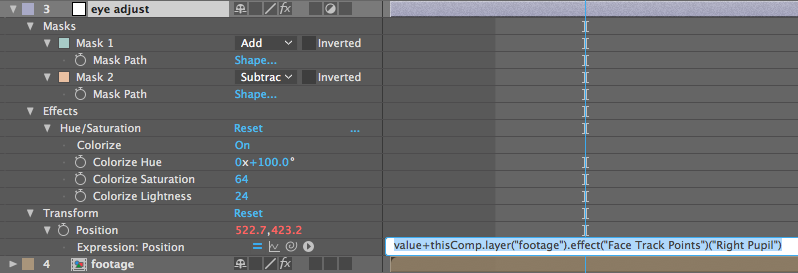
Effect Control Points
Some effects have one or more control points. For example, the Bulge effect has a “bulge center”. You can place such effects directly on the footage layer and link effect control points to track points as needed.

Adjustment Layers For Effects With No Control Points
For effects that don’t have control points (e.g., color correction stuff, blur, etc) you can add an Adjustment Layer and link its position to a facial track point. Use a Mask on the Adjustment Layer to narrow its focus to the feature you’re tracking.
Slight Detour: Extract & Copy Face Measurements
To get some more detailed info about what the actor’s face is doing, click on the mask and then return to the Tracker Panel. Go to your Rest Pose frame that you marked earlier, and click the Set Rest Pose button in the Tracker Panel. Then click the Extract & Copy Face Measurements. This will create a second special-purpose effect called Face Measurements with all sorts of keyframed properties within.
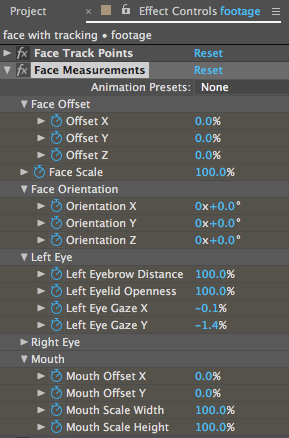
Note that some of these properties seem like they should be in terms of pixels but are instead in terms of percentage.
The 100% values are relative to the rest pose — pretty straightforward.
But the non-100% property values are not so straight-forward to use: they’re actually a percentage of the width, in pixels, between the outer corners of the left and right eyes. We have the track points for the eyes, but how do we get the width between the points?
Getting The Distance Between Two Points
Let’s add a Slider Control effect to our tracked footage layer and call it Eye Width.
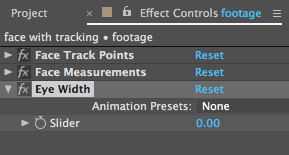
Now add an expression to the Eye Width Slider property and enter the following expression:
point1 = ; // Use expression pickwhip to grab the 1st point
point2 = ; // Same as above for the 2nd point
length(point1, point2);
The expression pickwhip should be used (not the parenting pickwhip.) Place the typing insertion point between the equals sign and the semi-colon before using the pickwhip.
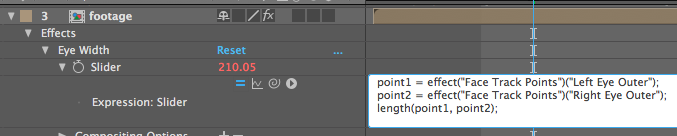
With this Eye Width property in place, we can now do some conversions between percentage and pixels from the Face Measurements effect!
Expression Controls For Intermediate, Reusable Numbers
Now we’re starting to use expression controls to do some intermediate calculations on the face track points. Let’s create one for calculating the Mouth Offset Y of the face. (This is the amount the mouth moves in the horizontal direction.)
Add a Slider Control and rename it to Mouth Offset Y Pixels. Add the following expression to its Slider property:
percentValue = ; // Pickwhip to a face measurement
eyeWidth = ; // Pickwhip to the Eye Width control
percentValue * eyeWidth
Then use the pickwhip to make it look like below:

Now we can use that Mouth Offset X Pixels value elsewhere in our composition, perhaps to position a mustache.
Angle Between Two Points
Sometimes you have two tracked points with [x, y] position data, but you need to use them to control a rotation property.
This expression, placed on any rotation property, will figure out the correct angle based on the two points you specify.
point1 = ; // <-- Pickwhip the 1st point
point2 = ; // <-- Same as above for second point
// The following code uses trigonometry to calculate the angle.
s = sub(point1, point2);
radiansToDegrees( Math.atan2(s[1], s[0]) ) + 180;
More Advanced Effects: Paint, Clone, Liquify, Mesh Deform
Sometimes we need to stabilize the whole face or just a feature in order to apply more complicated effects. The process looks like this:
- Stabilize Some Tracked Footage
- Sub-Comp The Stabilized Footage
- Apply The Effect To The Sub-Comp in an Outer Comp
- Sub-Comp The Effects Work
- Put the Effects-Work Sub-Comp in a Final Outer Composition
- Reverse the stabilization in this final comp (put the facial movement back.)
Stabilize Face Position
- Add a 2D Point Control to store Average Face Position
- Average Point expression: (p1 + p2) / 2;
- Add expression to footage anchor point to link it to the Average Face Position to stabilize position
Stabilize Face Angle
- Angle Control to store Face Vertical Angle
- Angle Between Two Points Expression
- Add expression to footage rotation property to link it to negative of the Face Vertical Angle (i.e., multiply it by -1)
Reverse The Stabilization In An Outer Comp
Drag the entire timeline of the sub-comp and the outer comp so that they’re both visible. Now you can use the expression pickwhip between comps!
- Connect the outer comp’s position property to the Face Center
- Connect the outer comp’s rotation property to the Face Vertical Angle