“Intro to Keying”
Concepts & Terms, Keylight & Refine Hard Matte effects, Basic Workflow
Hey, “Keying” is not the same as “keyframing” okay?
The basic idea is that on each frame, a particular color range, usually green or blue, is converted from opaque to transparent.
In general, keying is a process done to moving footage, although it can be used on still images as well as an alternative to manual masking.


Concepts and Terminology
- Sometimes referred to as simply Keying, or also Chroma Keying, or Color Keying, or Blue Screen Removal, or Green Screen Removal, and other variations…
- The colors Blue and Green are most frequently used due to their contrast with human skin colors; sometimes you might see a red screen when shooting non-human things that have both blue and green parts. White screen and black screen are sometimes used if the foreground object contrasts with the background enough.
- Some history: the very 1st chroma key effect in a movie! Thief of Bagdad (1940)
- The verb for the process is sometimes called “keying” or “keying out” or “doing a key”
- “Spill” – background color (green for example) which has bounced onto to the foreground subject due to being too physically close to the background green or blue screen.
- “Spill Suppression” – general term for a process done to video after it has been keyed. Removes or neutralizes the spill from the foreground subject.
- “Matte” – a black & white depiction of the transparency of an image. Kind of looks like an inverted silhouette, where the foreground is white (opaque) and the background is black (transparent). Various shades of gray can represent alpha values somewhere in between fully opaque and transparent.
- “Edge” – the boundary between foreground and background. Good chroma key work is all about nice, clean edges.
- “Edge Refinement,” aka “Matte Processing” – Basically, cleaning up the matte after the background color has been keyed out. Includes techniques such as “choking,” “refining the edge/matte,” “despotting,” etc.
The “Keylight (1.2)” & “Refine Hard Matte” effects
After Effects comes with a nice built-in chroma key effect called “Keylight.”
Keylight does it all: keying, spill suppression, and matte processing all in one effect.
After Effects also includes some standalone matte processing effects, one of which (the “Refine Hard Matte” effect) we’ll use instead of Keylight’s matte processing.
Basic Keying Workflow
- Isolate the clips you’ll use
- Import the raw green screen shoot footage in Premiere.
- Export an individual clip for keying. When exporting, select “Quicktime” for the Format, and under the Video tab make sure to use a good intermediate format such as Apple ProRes 422 (on Macs) or Avid DNxHR/DNxHD (on Windows.) Make sure that the output width and height, as well as framerate, matches the source.
- Import this clip into After Effects and drag it onto the New Comp button to create a new comp
- Add a garbage matte
A garbage matte is one or more masks which roughly isolate the foreground prior to the keying step. Use the mask tools to get rid of lights in the shot, stuff on the floor, non-green walls, etc.
In some cases you may need to animate the garbage matte masks by keyframing the Mask Path properties of the masks. - Setup the “Keylight (1.2)” effect
- Select your footage layer containing the green screen footage and add the “Keylight (1.2)” effect
- Use Keylight’s eyedropper to select the Screen Colour. There might be variation in the shades of green to choose from, so try picking a green that seems the least saturated. (You can always pick a different shade of green later on by temporarily disabling the effect.)
- Toggle the Transparency Grid to be on so that transparent areas of the comp look like a checkerboard.

Transparency Grid toggle button (center) - In Keylight’s View dropdown, choose Screen Matte to see the current Matte:
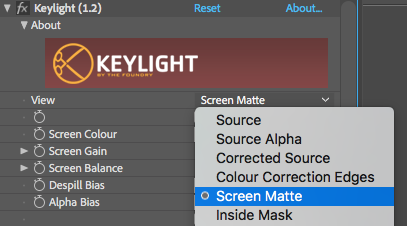

This matte still needs a little help - Open Keylight’s Screen Matte property group using the twirl-down triangle thingy.
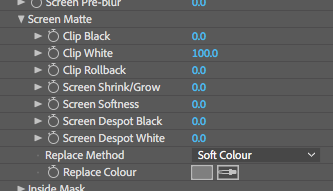
- Gradually increase the Clip Black property to clean up the gray/white noise from the black background areas.
- Gradually decrease the Clip White property to clean up the gray/black noise from the white foreground areas.
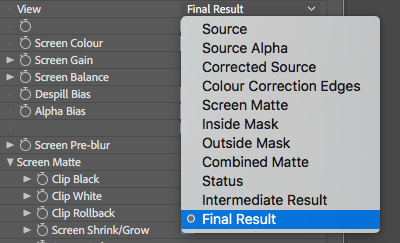
- Check the current results: Back in the View dropdown, choose Final Result to check your progress.
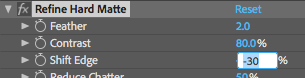
- Setup the “Refine Hard Matte” effect
- Sometimes we need to clean up the edge a little bit. Take a look at the outline in the before and after shots below:


- Add the “Refine Hard Matte” effect.
- Gradually increase the Increase Decontamination Radius property until the discolored edge goes away:
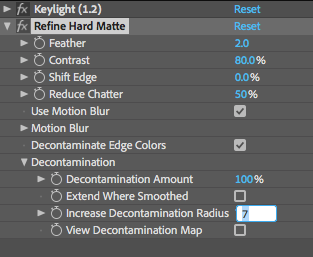
- Then decrease or increase the Shift Edge property to shrink or grow the edge:
- Optional: Try out the related effect Refine Soft Matte for situations where the matte edge is not so smooth and crisp. For example, hair, fur, foliage, etc.
- Sometimes we need to clean up the edge a little bit. Take a look at the outline in the before and after shots below:
- Check results at other points in time
- Move the playhead to different spots on the timeline and check the results.
- You may need to adjust the various effect properties, or even keyframe some properties if the keying results vary a lot over time.
- Render & Import back into After Effects
- Add the comp to the render queue and render it using codec settings that preserve the alpha info in the Quicktime file.
On Macs you can use Apple ProRes 4444: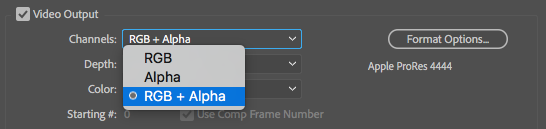
Very important to make sure “RGB + Alpha” is selected! Or on Windows you can use DNxHR/DNxHD:
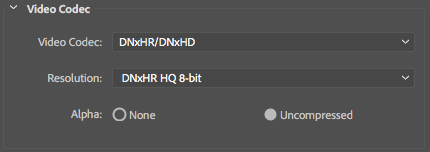
Make sure “Alpha: Uncompressed” is checked 
Very important to make sure “RGB + Alpha” is selected! - After the render is complete, import the rendered Quicktime file back into After Effects for use in a new comp. If all goes well with the render, the rendered footage should be transparent where the green screen was.
- Add the comp to the render queue and render it using codec settings that preserve the alpha info in the Quicktime file.
- Use the keyed out footage in a new comp!
Now you can use your nicely keyed out footage in a new comp. You could also do this using nested compositions instead, but by pre-rendering and then importing the rendered file you will save yourself lots of time.
Pre-rendering the keying process gives you more time to experiment and have fun during the compositing phase!
Keylight Reference
Lastly, feel free to check out the Full Keylight (1.2) reference manual. There’s a lot to it!