“AE basics pt. 0”
[ getting started, user interface, importing, comps, layers, transformations, masking, & exporting stills ]
-
- Let’s start up After Effects. This is its icon:

AE’s icon - Once launched, the app should take up the whole screen. (Dismiss the Start Screen window if it’s sitting on top of the app. This window can be disabled in AE’s preferences area, btw.)
- When opened, AE will automatically start a new, blank Project. From the menu select File > Save As > Save As… in order to name the project file and save it somewhere. This is important for the Auto-Save feature to work!
- Instead of Sequences like in Premiere Pro, AE has something slightly different called Compositions.
Create a new Composition (aka Comp) by any number of ways, including selecting menu Composition > New Composition…
When the Composition Settings window pops up, enter a Composition Name and choose the Preset called “HDV/HDTV 720 29.97”. Set the Duration to 5 seconds. (These settings can all be changed later, too.)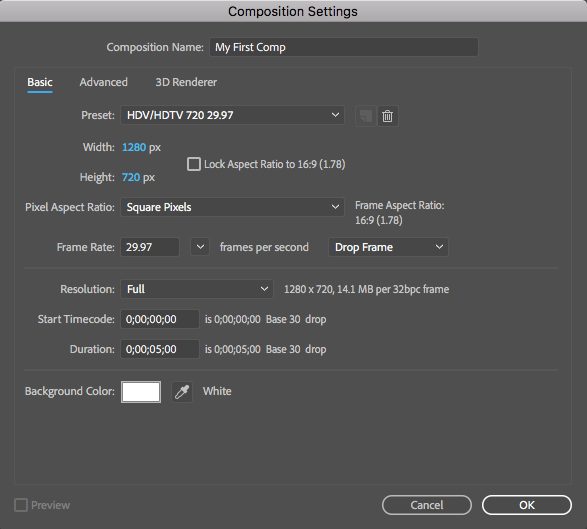
Composition Settings Then click OK to proceed.
- Imported items will be listed in the Project Panel. Import footage and stills any number of ways, including selecting the menu File > Import > File…
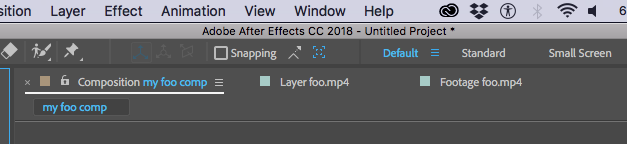
(BTW, you can also drag and drop items from a Finder or Explorer window into the Project Panel.) - You can drag imported items from the Project Panel into your new Comp. Each item you drag into a Comp gets its own Layer in the Comp.
(BTW, you can drag the same item into a Comp multiple times; it will just create a new Layer each time.) - Comps have a Timeline panel and a Comp Viewer panel.
It’s very important to understand that the Comp Viewer panel is different from two other kinds of Viewer panels that share the same screen area by default: the Layer Viewer panel and the Footage Viewer panel.
Tabbed viewer panels When starting out with AE, you will often only be interested in the Composition Viewer panel.
- The Composition’s Timeline panel is where you can see all your Layers and other good stuff. You can scrub through time, trim in and out points of layers, and slide layers left and right. Unlike layers in Premiere Pro, though, layers can contain one and only one item.
- To create a freeze-frame from some imported footage that has been dragged into a Comp, find the desired frame by scrubbing through time or by dragging the footage item left-right.
Make sure the layer is selected.
Select the menu item Layer > Time > Freeze Frame - You can transform a layer by changing its scale (aka size), position, rotation, and opacity (aka transparency).
Use the Timeline panel to access these properties for each individual layer.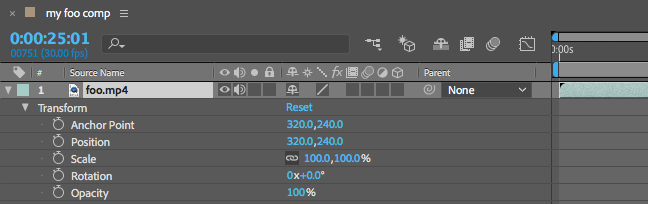
Transform properties (The Anchor Point property is used to control the spot that the layer rotates and scales around, but usually you don’t edit this property directly. Instead use the Pan Behind (Anchor Point) tool.)
- You can flip a layer horizontally by setting its Scale property’s width-component to negative. (You first have to unlink the width and height values, though; note small, dark square next to the -100, 100% numbers. Otherwise both values will turn negative.)

Negative width-scale property This also works for flopping a layer vertically. Just make the Scale property’s height-component negative.
- Masking is how you can cut layers up into smaller parts, almost like using a scissors.
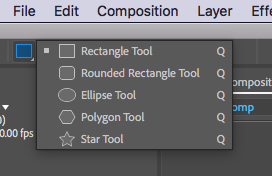
The basic masking tools look like this, and can do basic shapes:
 The more advanced masking tools look like this, and can achieve arbitrary shapes:
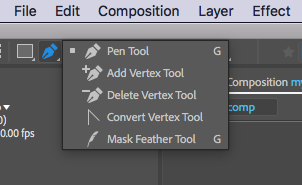 Masks must be “closed” to work. This just means that you must click on the first vertex point at the end drawing your mask.
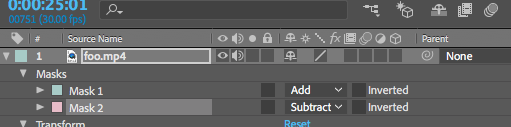
Layers can have more than one mask. Multiple masks get combined using a sort of “mask math” (my own, bad phrase.)
Masking is a big subject and you don’t have to master it right away! Try watching a tutorial on After Effects Masking to learn more. Here’s a nice tutorial:
https://helpx.adobe.com/after-effects/how-to/using-pen-tool-masks-aftereffects.html - Layers (and many other items in AE) can be quickly duplicated by pressing command-d (Mac) or ctrl-d (PC). Many different kinds of things (like layers) can be copy, cut, or pasted as well.
- The top-to-bottom order of layers affects how the different layers cover-up the other layers. Basically, layers “higher up” cover up layers “lower down” in the layer order.
- You can add Effects to layers! There’s a lot. Select a layer, then choose the menu item Effect > Color Correction > Levels, for example.
- To export a still image from your Comp, select the menu item Composition > Save Frame As > File…
The Render Queue panel will appear, probably right where your Timeline panel used to be. They share the same area with tabs.
In the Render Queue is a new render job that represents the rendering of your chosen still image. You can have multiple render jobs in the queue. - Adjust the various settings for this render job:
For Render Settings, use the drop-down arrow to choose “Best Settings” instead of “Current Settings”
For Output Module, click the blue text (it probably says “Photoshop”) and when the Output Module Settings window pops up, choose PNG Sequence, and set the Channels setting to RGB. Click OK to proceed.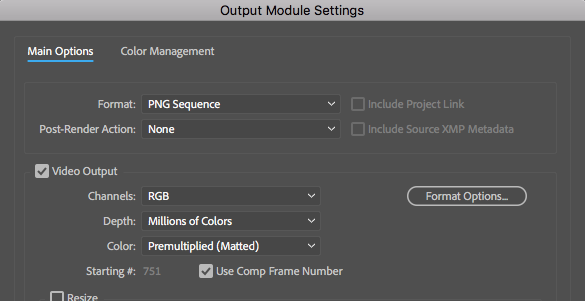
Output Module Settings Lastly, back in the Render Queue panel, we need to specify where the rendered file should be saved to. Next to the Output To setting, click on the blue text (probably named the same as your comp) to specify the render location.
- Click the Render Button in the Render Queue panel.
Go check your files to see if the render worked!
- Let’s start up After Effects. This is its icon: