Intro to Expressions
So far we have seen that properties can be animated using keyframes. There is an additional way to animate properties called “expressions.”
“Abracadabra!”
In After Effects, expressions are almost like little “recipes” or “spells” that can be attached to each individual property and executed on each frame. They look like text that has been typed into a small text area next to the property in the Timeline:

In the example above, the word “value” is a special term which refers to the current value of a property. The Rotation property was initially set to “100”, and so “value / 2” equals “100 / 2” which equals “50”.
Note that the value “0x+50.0°” appears in red. This indicates that an expression has been applied. Also, the blue equals sign is a toggle for turning the expression on or off.
Turning on (aka enabling) expressions for a property
Expressions are enabled for a property by option/alt-clicking the stopwatch icon next to a property. Do the same thing to turn the expression off, or simply erase the text inside the text area.
If you turn off the expressions for a property, all the text in the text area is lost, so hit undo if you did that by accident. Sometimes simply toggling the blue equals sign is a nicer way to go, if you simply want to temporarily disable it.
Properties values that are multiple numbers
Some property values are simple, single numbers, like Rotation or Opacity.
But some property values are combinations of numbers, like Scale (e.g., “100%,111%”) or Position (e.g., “640.0,480.0”). When typing out values that contain multiple numbers, use the following square-bracket syntax:

Expressions on more than one line
Some expressions take up more than one line. You can resize the expression area by click-dragging on the bottom border of the text area. You must separate multiple lines using a semicolon as shown below:

Storing intermediate values in variables
During an expression, you can store intermediate values in things called variables. Variables are just words or phrases (without spaces) that you make up. (They also can’t start with a number, and there’s certain reserved keywords like “value” that are off limits, too.) The general pattern looks like this:
variableName = something
That puts the value “something” into the variable “variableName”.
Here’s some more concrete examples:
temp1 = 10;
myCoolVariableName = [96,205];
spaceshipSize = myCoolVariableName;
When you need to refer to the individual numbers of a multi-number variable (like myCoolVariableName above) the square-bracket syntax looks like this:
myCoolVariableName[0]
which is equal to 96, or:
myCoolVariableName[1]
which is equal to 205. As you can see, inside the square-brackets, the positions of the individual values are numbered starting at 0.
Take another look at the multi-line expression example above to see this syntax in action as well.
Comments within expressions
Expression syntax is very precise, exacting, and not always intuitive. So sometimes it’s helpful to store little notes to yourself within the expression. These are called comments. After Effects basically ignores anything inside a comment. You can start a one-line comment with double-forward-slashes (ie, ‘//’) or enclose multi-line comments with a /* and a */ like this:

How After Effects evaluates the result of an expression
On each frame, After Effects evaluates each line of an expression from top to bottom, and then uses the result of the bottom-most line as the new value of the property. (In one-line expressions, the one line is the bottom-most line.)
For illustration purposes, here’s a silly expression that has multiple lines for no reason:

In the example above, AE evaluates each line from top to bottom, and then uses the bottom-most line as the value for the property. Since the bottom-most line has nothing to do with the lines above it and is simply “12”, the property gets set to 12.
If you go back and look at the multi-line expression example above, you can see a less silly demonstration. In that example, the bottom-most line is [temp1,temp2], which AE will then use as the final value to assign to the Scale property.
Keyframes and expressions combined
Sometimes a property can have both keyframes and expressions enabled. On each frame, After Effects first evaluates the effect of the keyframes, and then applies the effect of the expression. Here’s an example of an property that is keyframed and has an expression enabled:

In the example above, the Blurriness property is keyframed from 0 to 10. The current time is right in the middle of the keyframes, and so without any expression the value is 5.0. With the expression applied, the value becomes 5.0 + 1, or 6.0 (seen in red).
The expression language menu
Since it can be tough to memorize all the precise ways to write expressions, After Effects provides a handy little menu that will plug in expression code for you. You access it by clicking on the little black triangle to the right of the blue equals sign:
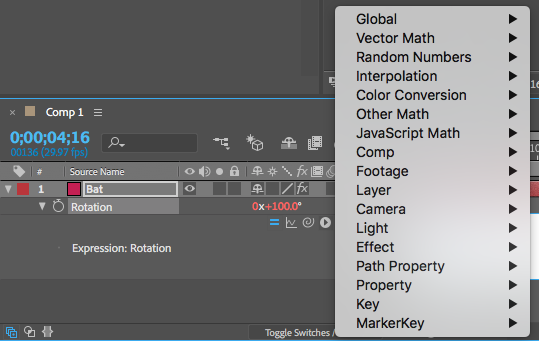
The most commonly used expressions are under the Property submenu. For example, to add a loopOut expression to a property, which loops the animation of a property’s keyframes, select Property > loopOut(…):

Referencing other properties, and the expression pick whip
In your expressions you can refer to the values of other properties.
Each property has a text name for use in expressions that is somewhat reminiscent of the way street addresses work. (When you enable expressions for a property, you’ll first see the text name of that property.)
In the example below, the Opacity of the Bat layer is tied to the Rotation of the Pop layer.

But remembering the syntax of how other properties are written out is tough, so After Effects provides the expression pick whip to make your job easier. It’s the little spiral icon (or snail?) to the left of the expression language menu.
To use it, first make sure the other property you’re trying to refer to is visible in the timeline. Then, with the text cursor inside the expression text area, click and drag on the expression pick whip to reveal the stretchy whip line. Drop the whip onto the other property. AE will insert the correct text name of the other property.
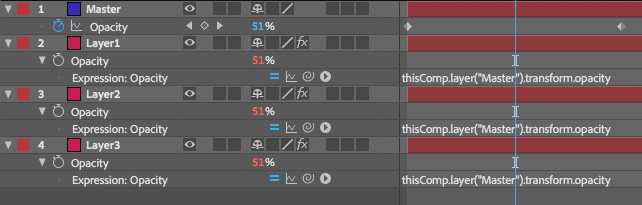
This is how you can create relationships between properties that go above and beyond what parenting can do. For example, you can have a layer act as a master opacity controller for other layers, and only do keyframing on the master layer: