“Intermediate After Effects (pt. 1)”
Motion paths (auto orient, using mask paths, etc), Motion Sketch, Smoother & Wiggler, Puppet tools
Motion Paths
- “Motion Paths” are simply the paths taken by moving layers (or moving effect control points) and always involve spatial keyframes (e.g., position, anchor point, effect control point keyframes)

- The curvy line above is the motion path of the star.
- The little dots along the line represent the position at each frame. In this example, all the little dots are evenly spaced apart, so we know the star will be moving at a constant speed (not speeding up or slowing down).
- By default, AE displays only an excerpt of a motion path. But you can adjust this using this setting from “Preferences > Display…”

- Use a layer’s Auto-Orient setting to make the layer rotate in sync with the motion path.
- When this setting is On, a layer will rotate on-the-fly to make it appear to follow the contours of its motion path
- It’s independent of (or, in addition to) the layer’s actual Rotation property.
- To enable Auto-Orient for a layer:
- First select the layer.
- Then select menu item “Layer > Transform > Auto-Orient…”
OR: Right-click the layer and select “Transform > Auto-Orient…”

- Select Orient Along Path and click OK
- Optionally, you might need to adjust the layer’s Rotation property to fix ‘misalignment’ with the motion path (e.g., a spaceship that is flying perpendicular to its path may need to be rotated 90 or -90 degrees so that it points the right way.)
- Depending on the ‘roughness’ of the motion path, Auto-Oriented layers can occasionally behave in a “glitchy” way. Check out this solution (using expressions) to bring some more smoothness to the auto-orientation: http://mindfury.com/?p=420
- Using a Mask Path as a layer’s motion pat
- You can draw a layer’s motion path as a mask, or copy/paste any existing mask path (for example, a text layer that has been converted to a mask.)
- Select the Mask Path property and Copy it to the clipboard
- Select the target layer’s Position property and Paste from the clipboard
- The target layer’s position property will now have new position keyframes corresponding to the points from the Mask Path
- The keyframes will probably have a very short time-span. Adjust the overall duration of the new keyframe animation to suit your needs.
- Side note: Keyframes that Rove Across Time
- You can draw a layer’s motion path as a mask, or copy/paste any existing mask path (for example, a text layer that has been converted to a mask.)
Motion Sketch
- A way to record the movement of the mouse and save the movement as position keyframes
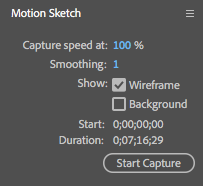
Motion Sketch panel - To use:
- Display the Motion Sketch panel using menu item Window > Motion Sketch
- Set the work area for the sketch capture to use (try B and N shortcut keys to set the beginning and end of the work area)
- Select the layer whose movement you want to sketch
- Set the Motion Sketch settings:
- Capture speed at: how fast to play back your hand motion. Example: set to 50%, and the overall animation will be 50% as long
- Smoothing: how much to smooth out your hand motion (somewhere between 1 and 10 is usually okay)
- Show Wireframe: whether to see a dot or a box when recording the motion
- Show Background: whether to show the other layers when recording the motion
- Click the Start Capture button in the Motion Sketch panel to get the recorder ready
- As soon as you start dragging the layer around, the recording will begin
- As soon as you let go, the recording will stop
- Check your work; if you don’t like it, hit Undo and try again
- You can always use the Smoother and/or Wiggler panels (below) to help add additional smoothness or wiggle to your motion sketch after the fact
Smoother & Wiggler
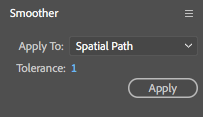
- Smoother panel
- A tool for simplifying the complexity of too many keyframes
Smoother panel - Unlike most operations in AE, it’s not non-destructive: It will replace your keyframes with a set of new, simpler keyframes. You can undo this, but if you restart AE you are stuck with the results and can’t get your old keyframes back. (You can get around this limitation using the smooth() expression instead.)
- To use:
- select the keyframes to simplify (at least three must be selected, usually you will be selecting many of them.)
- Set the Smoother settings:
- Apply to: This should be Spatial Path when smoothing position-related animation, and Temporal Graph when smoothing out the speed changes of something
- Tolerance: How much smoothing to perform.
- Click Apply and check the results. You’ll probably need to experiment with the Tolerance setting to find a good value. Try a value, click Apply, maybe click undo, repeat.
- A tool for simplifying the complexity of too many keyframes
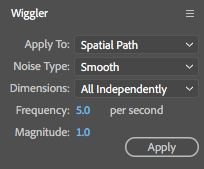
- Wiggler panel
- A tool for adding some “organic” randomness to any property’s keyframes
Wiggler panel - Similar to the Smoother, this tool is not non-destructive: It will replace your selected keyframes with a set of new, “wigglier” keyframes. You can use undo until you restart AE. (Again, you can get around this limitation by using the wiggle() expression instead.)
- To use:
- select the keyframes to add the random wiggle to (at least two must be selected)
- Set the Wiggler settings:
- Apply to: Similar to the Smoother
- Noise Type: smooth or jagged wiggle
- Dimensions: for spatial keyframes, how to handle the x and y wiggle
- Frequency: how many times per second to wiggle
- Magnitude: how much to wiggle each time
- Click Apply and check results. You’ll probably need to experiment with the various settings to find good values. Try different values, click Apply, maybe click undo, repeat.
- A tool for adding some “organic” randomness to any property’s keyframes
Puppet tools
These tools are used to animate the deformation of a layer as if it were made of rubber, with the option of some parts of the layer being “stiffer” (ie, “starchier”) than others.
The Puppet Pin tool is used first. It automatically adds an effect to the layer called Puppet. This is a special kind of effect that AE adds for you; you don’t usually apply the Puppet effect manually.
Optionally, you use the Puppet Overlap and Puppet Starch tools afterwards to fine-tune the deformation of the Puppet effect.
- Puppet Pin tool
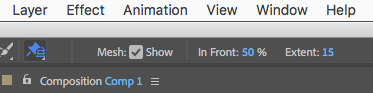
- Use this tool first! When it is selected, you can see its related options in the toolbar:

The Puppet Pin tool and its options - To use:
- Go to the beginning of the Comp
- Select a layer to deform
- Use the Puppet Pin tool to drop some Pins on various parts of the layer
- Adjust the Puppet mesh
- Go to another point in time in your Comp and drag the Pins around to deform the layer
- Repeat Step 5 as often as you like to bring the layer to life!
- It takes some practice to know how many pins to use and where to put them, but in general some pins will go on the moving “extremities,” and some will go on the non-moving “body”
- For example, an animated starfish might have pins like so:
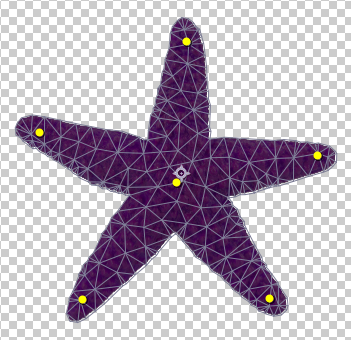
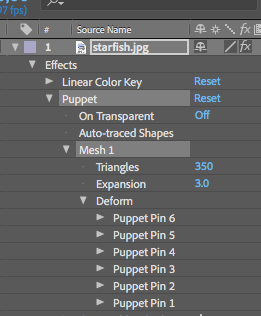
Puppet pins on a starfish - The “mesh”: After dropping the first pin, AE will place a mesh of triangles over the layer that follows the contour of the layer’s alpha channel. The Puppet tools are generally not used on layers that have no transparency info, such as solid rectangular footage items.
- You can hide and show this mesh using the toolbar options. You can expand or contract the mesh with the Expansion setting, and you can simplify or add more detail to the mesh using the Triangles setting. You can see these settings in the timeline, too, where it can be a little easier to change them after the fact:
Puppet Pin mesh settings in the timeline panel - The mesh is used to virtually slice up a layer when deforming. More triangles means the deformation will have finer detail, but will render more slowly. Use as few triangles as you can get away with!
- The mesh must be expanded just beyond the contours of the layer. Otherwise you will see scraps left behind!
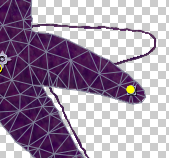
Oh no! This mesh wasn’t expanded enough, so some scraps are left behind when deforming Make sure to expand the mesh just beyond the contours of the layer. Don’t expand too much though, or the mesh will begin to intersect itself and become less useful.
- Each Pin of the Puppet Pin tool automatically has its keyframes turned on! This is because AE assumes you will want to animate the layer after dropping some pins.
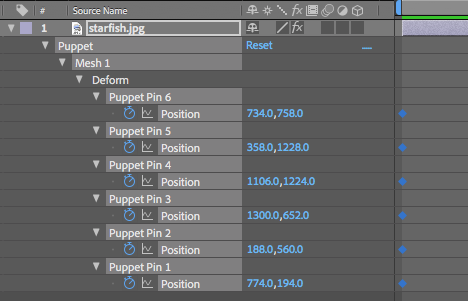
Puppet Pins will already have keyframes enabled - You can select (and move) multiple Puppet Pins simultaneously. Just hold SHIFT down when clicking on the Pins to select more than one.
- You can animate the Puppet Pins similar to the Motion Sketch tool. Click the Record Options in the toolbar for more info:
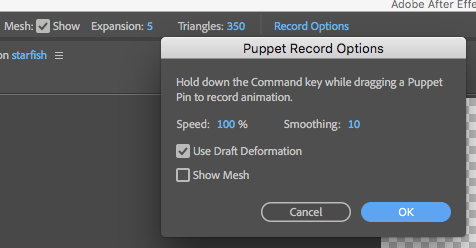
The Puppet Pin tool Record Options After recording a sketch of the Puppet Pin motion, you will have a series of keyframes. Their timing can be changed by either:
- selecting all of them and then option-dragging (alt-drag on PCs) the 1st or last keyframe in the selection
- OR: Convert all the inner keyframes to Rove Across Time, just like the Motion Sketch tool produces:
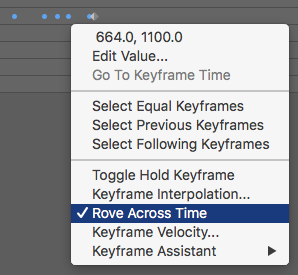
Change the inner keyframes to Rove Across Time in order to alter the timing proportionally
- Use this tool first! When it is selected, you can see its related options in the toolbar:
- Puppet Overlap tool
- This tool helps AE know which parts of a layer should overlap or go behind other parts of the same layer when moving Puppet Pins around.
- Select this tool by clicking and holding down the mouse button on the Puppet tool button:
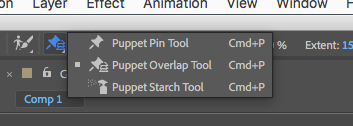
Click and hold down the mouse button to choose different Puppet tools - The Puppet Overlap tool has its own settings, similar to the Puppet Pin tool:
The settings for the Puppet Overlap tool - Make sure to show the mesh! It will always look like the original layer prior to any deformations.
- Use the Puppet Overlap tool to drop Puppet Overlap Pins. These pins indicate “overlappiness” amounts of different spots on the mesh. AE compares the In Front value to other parts of the mesh to see what should appear in front of what. The Extent setting indicates how far from the Overlap Pin the In Front amount should apply.
- Puppet Starch Tool
- This tool helps AE know which parts of a layer should be more rigid, or starchy, than other more rubbery parts. For example, on a human arm, the elbow and wrist might be rubbery, while the upper arm and forearm might be starchy or rigid.

Puppet Starch tool settings - Similar to the Overlap Tool, you drop Puppet Starch Pins where you want to alter the starchiness.
- This tool helps AE know which parts of a layer should be more rigid, or starchy, than other more rubbery parts. For example, on a human arm, the elbow and wrist might be rubbery, while the upper arm and forearm might be starchy or rigid.