“AE basics (pt. 2)”
[keyboard shortcuts, previewing, keyframes]
- A Note on Keyboard Commands
- To move forward and backward one frame in time, use Page Down / Page Up (as opposed to the Left / Right arrow keys like in video editing). Use SHIFT-PageUp/Down to move 10 frames instead of just 1.
- The up/down/left/right Arrow keys are instead generally used for changing the position of a layer
- The minus (-) and equals (=) are used for magnifying the zoom of the timeline’s display of time.
- Undo is command-z on Macs and control-z on Windows computers. Keep your left-hand on the Undo keys at all times, it’s quite handy.
- The u key is a special key command known as the uber key. It’s very useful for revealing and hiding a layer’s keyframes.
- Double-tapping the u key does something slightly different: it reveals any modified property of a layer, whether they are keyframed or not.
- When working with keyframes, it’s useful to use the j and k keys to jump to previous/next keyframes
- Quickly set the work area with the b and n keys
- Previewing Animation
- When animating in After Effects, you can’t simply hit Play like in Premiere to see your work, you have to learn how to use the Preview controls
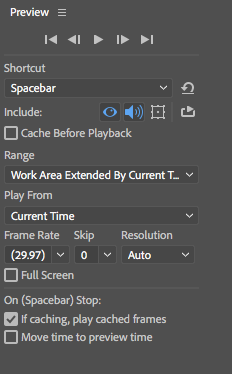
- AE has a special panel for Previewing as well as customizing the Preview shortcut keys
- I recommend the following setting for the Spacebar shortcut:
- Use the Work Area to control how much to Preview. Set the Work Area quickly with the b and n keys.
- Keyframes – changing property values over the course of time
- Most properties in After Effects can be Keyframed, or animated over time
- The term comes from hand drawn animation, where a lead artist would draw the key frames of an animation sequence, and “in-between” artists would draw the intermediate frames (i.e., “tweening”.)
- Properties in AE are either in “Regular mode” (how they start out in life) or “Keyframe mode” – You turn on Keyframe mode by clicking the Stopwatch icon to the left of a property.
Switch back to Regular mode by clicking the Stopwatch again (but beware, you’ll lose any keyframe work you’ve done in the process, so hit UNDO if you do this by accident). - When first learning about keyframes, open menu item After Effects CC > Preferences > General… and enable the setting Default Spatial Interpolation to Linear in order to avoid unexpected “boomerang” motion:
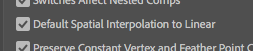
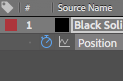
Make sure this setting is enabled when 1st learning keyframes - When you turn on Keyframe mode for a property, AE will automatically create a new Keyframe wherever the current-time indicator (“CTI”) is at. The current value of the property will be set in that keyframe. You’ll also see some new controls on the property: Previous and Next Keyframe and a Add / Remove Keyframe button in the middle:

Keyframe navigation buttons - Move to another point in time and add a second keyframe by clicking the Add / Remove Keyframe button. Then change the property to some new value. Or simply change the property value; AE will add a new keyframe at that place in time. You can now use the Previous and Next Keyframe buttons (or the j and k keys) to jump back and forth between the two keyframes.
- When a layer is in Keyframe mode, AE will automatically add new Keyframes if you change a property value anywhere in time. This can lead to mysterious problems if you’re not careful, especially when accidentally changing the position of a layer with the mouse or arrow keys at arbitrary points in the timeline.
- AE figures out what the comp should look like in between keyframes by Interpolating the property from one value to another.
- Sometimes what you want is for a value to change at the same speed the whole time, for example a car moving from left to right at constant speed. This is called Linear interpolation.
- Other times you might want the property’s value to change gradually at first, and then more quickly towards the end, e.g. something falling from the sky, or a slowly fading light. This is called Exponential interpolation. AE provides some “Keyframe Assistants” (Easy Ease In, Easy Ease Out, Easy Ease) as good starting points for exponential interpolation for you to work with. Right-click on a keyframe to access these keyframe assistants:
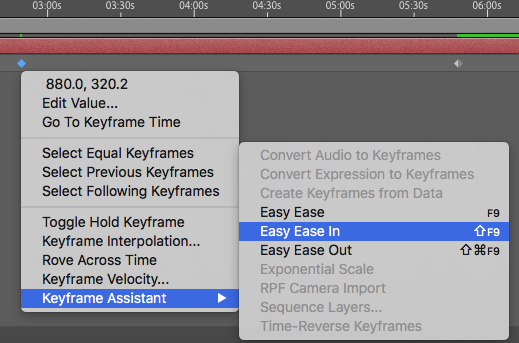
Keyframe Assistants - Sometimes you don’t want AE to interpolate the in-between frames between two keyframes; you may want AE to “hold” the value of the most recent keyframe constant until a new keyframe is encountered. So, for any pair of keyframes, you can set the left (earlier) keyframe to be a Hold Keyframe to turn off this interpolation until the next keyframe, thus holding a value constant.
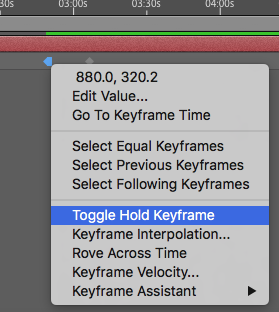
Toggling a keyframe’s Hold state This can create sudden jumps in values as opposed to smooth changes. Useful for instantaneous changes (e.g., a seconds hand of a clock sometimes appears to instantly tick clockwise around the clock, or a light may instantly turn on or off, or a layer may instantly be transparent or opaque, etc.)
- Right click on a Keyframe to play with all the various interpolation settings under Keyframe Interpolation…
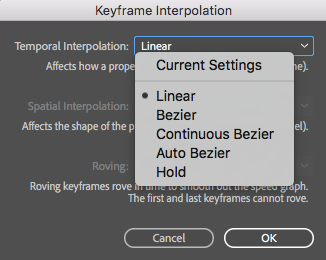
Full Interpolation Settings - Interpolation types
- Linear means a value changes at a constant rate. This usually appears somewhat mechanical, non-organic.
- The three types of Bezier interpolations are more smooth and organic. (They go from most customizable to most automatically smooth)
- Hold is for instantaneous change.
- Spatial vs Temporal Interpolation
- It can be a little weird to think about at first, but After Effects distinguishes between temporal and spatial interpolation.
- All properties have a temporal interpolation setting. This is simply how fast or slow (or some gradual combo) the value changes over time.
- Some properties (i.e. usually position-related properties) also have a spatial interpolation. This affects how smoothly a position property moves through space.
- As an example, consider a Tortoise and Rabbit racing around a perfectly square track.
- The Rabbit quickly goes from a standstill to top speed, then gradually slows down towards the end of the race. The tortoise goes from a standstill to his top speed somewhat slower, and stays at that speed until the end. That’s temporal interpolation in action.
- Now consider the paths they trace as they take the turns of the square track. The Rabbit rounds the corners really fast, and thus probably traces smooth curves around the corners. The Tortoise, going much slower, probably turns the corners of the square track much more sharply, more like perfect 90-degree turns. That’s spatial interpolation in action.
- Keyframes can be dragged left and right in time. This changes the speed of change, or when changes begin and end.
- Keyframes can be copied and pasted on the same layer or between different layers
- “Proportionally Resizing” keyframes in time: Sometimes you need to squeeze or grow several keyframes relative to each other in time. Select them and then hold down “Option” (on a Mac) when dragging the 1st or last keyframe in a group.
- Adobe’s official keyframe documentation: