Intro to 3D
- Review of how 2D layers come together
- In the comp viewer, some layers appear in front while some appear behind other layers.
- In the timeline, it’s almost as if we’re seeing the layers like a stack of sheets from the side, with an imaginary camera looking down from the top.
- In the timeline, we can drag and change a layer’s vertical ordering to move it “in front” or “behind” other layers
- That’s how 2D layers behave at least, but 3D layers ignore layer order, and instead use their position in 3D space to determine whether one is in front or behind another.
- Toggling a layer between 2D and 3D
- Important: Before getting started, make sure your comp is set to use the Classic 3D renderer. Open comp’s settings, go to the 3D Renderer tab, and make sure it’s selected:
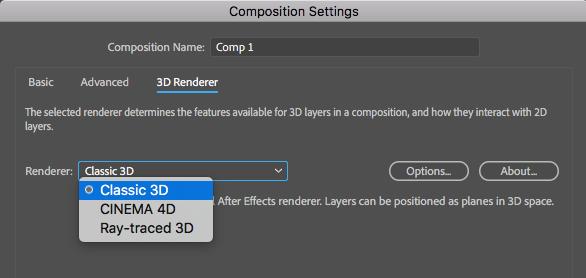
Make sure Classic 3D is selected! (This is the default, but it can get set to something more advanced and make your life mysteriously hard.)
- Each layer has a 3D toggle switch. It looks like a little 3D cube. They look like this when enabled:

Layer A and Layer B are 3D layers, but Layer C is a 2D layer - Comps can have a mixture of 2D and 3D layers, but novices should generally avoid mixing up 2D and 3D within the same comp, because the resulting behavior can be nonintuitive. (The exception to this rule is when using a 2D Solid layer for a 3D effect e.g., CC Particle World.)
- Important: Before getting started, make sure your comp is set to use the Classic 3D renderer. Open comp’s settings, go to the 3D Renderer tab, and make sure it’s selected:
- New Stuff That 3D layers Can Do
- Red, green, and blue axis arrows now appear on the layer at the anchor point and correspond to X, Y, and a new “Z” direction, respectively:

- New Transform properties, mostly related to adding the Z dimension
- Anchor Point and Position get new Z-stuff
- Scale gets new Z-stuff
- Rotation gets split into X-Rotation, Y-Rotation, and Z-Rotation.
You can think of these like axles that the 3D layers rotate around. - An “Orientation” property is added, which is another set of values for adjusting the layer’s 3D rotation.
- New Material Options property group
- Won’t do anything just yet. Mainly affects how the 3D virtual light ‘bounces’ off of or shines through these 3D layers
- Also: whether or not the layer casts Shadows (defaults to No)
- And: Whether or not the layer respects or ignores Lights (defaults to Yes)
- And: How much the layer behaves like “stained glass” or gels (“Light Transmission,” defaults to zero.)
- And: Rudimentary material surface properties like shininess
- X, Y, Z Axis Arrows
- Colored Red, Green, Blue respectively (just remember “x.y.z., R.G.B.”)
- Hover the mouse over the X, Y, or Z axis arrows until the cursor changes into an arrow with an X, Y, or Z
- With the Arrow Tool selected, the X, Y, Z axis arrows can be used to move the layer around
- With the Rotation Tool selected, the X, Y, Z axis arrows can be used like axle rods to rotate the layer
- Make sure to hover the mouse cursor over the arrows properly before moving/rotating (so that the cursor turns into an arrow with X, Y, or Z), or unexpected results can occur! (But just press undo if that happens.)
- Red, green, and blue axis arrows now appear on the layer at the anchor point and correspond to X, Y, and a new “Z” direction, respectively:
- User-created Cameras
- Cameras are represented as Layers in the timeline panel. You create them as you would create any new layer:
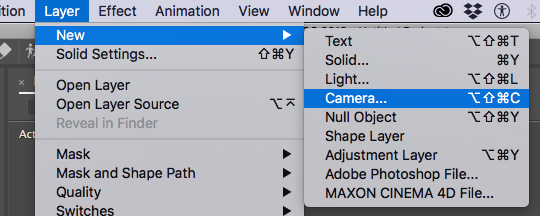
Creating a new camera layer - Once the Camera Settings window opens, there are two Types of camera to choose from:
One-Node Camera – camera behaves like it’s on a tripod.
Two-Node Camera – camera behaves like it’s on a selfie stick that’s attached to a “Point of Interest” - Then you can choose from various Presets for the camera Focal Length:
- 50mm is roughly what the human eye sees
- Less than that (e.g., 24mm) and it’s considered wide angle
- Greater than 50mm (e.g., 80mm) and it’s considered telephoto
- The camera Focal Length can be adjusted (and animated) using the Zoom property (accessed via the camera layer in the timeline)
- Depth of Field toggle
When turned on, the camera will get a Focus Distance property. This is an imaginary plane which cuts thru 3D space. Items which are on this plane will be in focus; otherwise they will gradually become blurry the farther they are from the plane.- Focus Distance – usually adjusted later using the comp viewer to help
- Aperture, Blur Level, etc settings – control the effect of the depth of field
- Cameras are represented as Layers in the timeline panel. You create them as you would create any new layer:
- Moving Cameras Around
- The Camera tools in the toolbar are used to manipulate the position and rotation of the active camera. There are 4 sub-tools. You can press the C shortcut key repeatedly to cycle between them all:
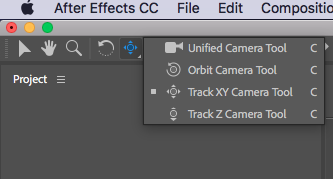
- Orbit Camera Tool rotates the camera. In the case of a one-node camera, the camera’s Orientation property (similar to rotation) is altered. It rotates like a camera on a tripod. In the case of a two-node camera, the camera’s Position property is altered. It rotates around its point-of-interest, as if attached to a selfie stick.
- Track XY Camera Tool moves the camera up, down, left, and right. For a one-node camera only the Position property is altered. For a two-node camera both the Position and Point of Interest properties are altered.
- Track Z Camera Tool moves the camera forward and backward. Only the Position property of the camera is altered, regardless of camera node type.
- Unified Camera Tool requires a 3-button mouse and behaves like a combo of the 3 later tools. Each of the three buttons of the mouse gets assigned to Orbit, Track XY, and Track Z.
- The Camera tools in the toolbar are used to manipulate the position and rotation of the active camera. There are 4 sub-tools. You can press the C shortcut key repeatedly to cycle between them all:
- How multiple camera layers are handled by AE
- Active Camera refers to the top-most camera in the timeline at a given time
- The current Active Camera can change throughout a Comp if there is more than one Camera layer present
- Trimming Camera layer in and out points allows for switching between Active Cameras within a comp
- Changing the “3D View” dropdown to see 3D layers from other angles
- You can think of the the Comp Viewer window as being like looking thru the viewfinder of a camera.
- When working in 3D, as in real life, sometimes you need to step back from looking thru the viewfinder of the main camera and instead look at things from other angles to make sure stuff is set up properly.
- The 3D View Dropdown lets you choose from different angles to look at your scene:

- Even without any Camera layers in the timeline yet, there are ten different built-in camera angles to choose from.
- “Active Camera” refers to whichever Camera layer is currently top-most in the timeline. (If there’s no Camera layer, like in this case, then AE pretends there is one, but you can’t manipulate it. It has a 50mm lens.)
- The next group (Front, Left, etc) are “isometric,” meaning they don’t display any perspective: i.e., layers that are far away look the same as layers close up.
- The last group (Custom View 1, Custom View 2, etc) display the scene from any arbitrary angle and are not isometric–they show proper perspective.
- These built-in angles are used just while working. When you eventually render a comp, the Active Camera is always used.
- How 2D layers and 3D layers coexist with each other
- 2D background layers
- 2D foreground layers
- Hey, a heads up: The effect of 2D layers in between 3D layers. Try to avoid unless you know what you’re doing.
- Local Axis Mode, World Axis Mode, View Axis Mode
- By default, the 3D axis arrows on a 3D layer (footage, camera, or even lights) are displayed relative to the orientation of the layer. So if you rotate the layer, the axis arrows get rotated too.
But sometimes it’s helpful to have the axis arrows displayed relative to the active camera, or other times it’s best to display them relative to an absolute, universally shared point of view called “world.” - Changed via the toolbar

These adjust which “point of view” the Axis Arrows take. - Local Axis Mode – This is the layer’s point of view. Axis Arrows are aligned with the layer itself (this is the default mode)
- World Axis Mode – This is the “world” or absolute point of view. Axis Arrows are drawn aligned to the “world” coordinates, ignoring what the layer or any cameras are doing, rotation-wise.
- View Axis Mode – This is the active camera’s point of view. Axis arrows are drawn aligned to the currently selected camera or custom view.
- By default, the 3D axis arrows on a 3D layer (footage, camera, or even lights) are displayed relative to the orientation of the layer. So if you rotate the layer, the axis arrows get rotated too.
- Using 3D Null layers
- As parents of other 3D layers – similar benefits of using 2D Nulls
- As Parents or Point-of-Interest targets of cameras – more control over camera keyframe animation